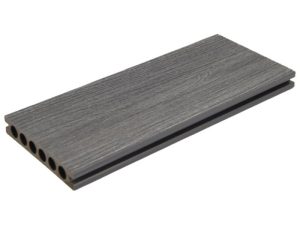
Plastic wood floor tiles are becoming an increasingly preferred material for outdoor and balcony flooring in households due to their environmentally friendly and durable characteristics. Many people may think that installing floor tiles requires professional tools and complex techniques, but in reality, as long as they master the correct methods, ordinary residents can completely complete the installation independently with simple tools. It not only saves a considerable installation cost, but also allows you to personally experience the sense of achievement of creating a comfortable space from scratch. Next, we will guide you step by step to easily achieve independent installation of plastic wood floor tiles.
Preparation work before installation of plastic wood floor tiles
Measure the installation area and calculate the required quantity of plastic wood floor tiles, keels, and accessories. Ensure that the ground is flat, solid, and dry. If there are obvious unevenness, it needs to be leveled with cement mortar. Place the plastic wood material in the installation environment for 48 hours in advance to adapt to temperature and humidity. Prepare basic tools such as rubber hammers, hand saws, tape measures, pencils, etc., and plan the paving direction and arrangement of the keel. The recommended spacing between keels is usually 30-40 centimeters. Cleaning up debris on the ground can be done by pre laying moisture-proof pads to enhance the effectiveness of use.

Step by step detailed explanation of the installation process of plastic wood floor tiles
Start laying the first floor tile from one corner of the ground, ensuring that expansion joints are reserved with the wall. Fix the dedicated buckle in the groove on the brick side, align adjacent bricks and press down, and lock it with a “click” sound. Use a rubber hammer to lightly tap the edges to make the joint tight. When encountering obstacles, mark the cutting line with a pencil and use a hand saw to complete the cutting. Check the flatness every three to five rows, and use plastic pads to fine tune the height. Keep the brick surface clean throughout the process to avoid unevenness caused by sand particles.

Maintenance skills and common problem handling after installation
Daily cleaning can be done by wiping with clean water or neutral detergent, avoiding strong acids and alkalis. Stubborn stains can be lightly brushed with a soft bristled brush. If there are slight scratches in the local area, they can be repaired with a similar colored repair pen. If there is a slight adjustment of the gap between the boards due to thermal expansion and contraction, it is a normal phenomenon and usually eases with stable temperature. In case of unexpected warping, check whether the base layer is flat or whether there are sufficient expansion joints reserved during installation. If necessary, partial disassembly and adjustment can be carried out. It is recommended to use outdoor shading facilities in areas with long-term exposure to sunlight to extend their service life.